

How To Draw Horse Head Ink
The following is a full step by step tutorial on How to Draw a Equus caballus with Colored Pencils by artist Carrie L. Lewis. You lot tin can larn more about her in the bio department at the stop of this cartoon lesson.
Colored Pencil Cartoon Tutorial – Palomino Arabian Filly – Directly Cartoon Method
viii×10 Original Colored Pencil on Rising Stonehenge, 90 lb., Natural
The subject of this portrait is a yearling filly. She's an Arabian that has the typical Arabian "wait" and a unique color. The lighting was good and color saturation on the photograph was also good. The icing on the cake was that I had the opportunity to find this cute horse. Personal ascertainment provides a little bit more than information for drawings than working solely from pictures.
The method I used for this cartoon was the direct method. I also chose a colored newspaper that provides a base for both the colt and the groundwork in order to reduce the amount of drawing fourth dimension necessary.
Unless otherwise stated, all the pencil I used are Prismacolor Thick Atomic number 82 pencils. Color names are for those pencils and may vary depending on the make you use.
The Reference Photo
The first stride for any drawing or painting is preparing the reference photograph. I put a grid over the part of the photo I want to depict using photo processing software. When I'thousand finished, my reference photo looks like this.
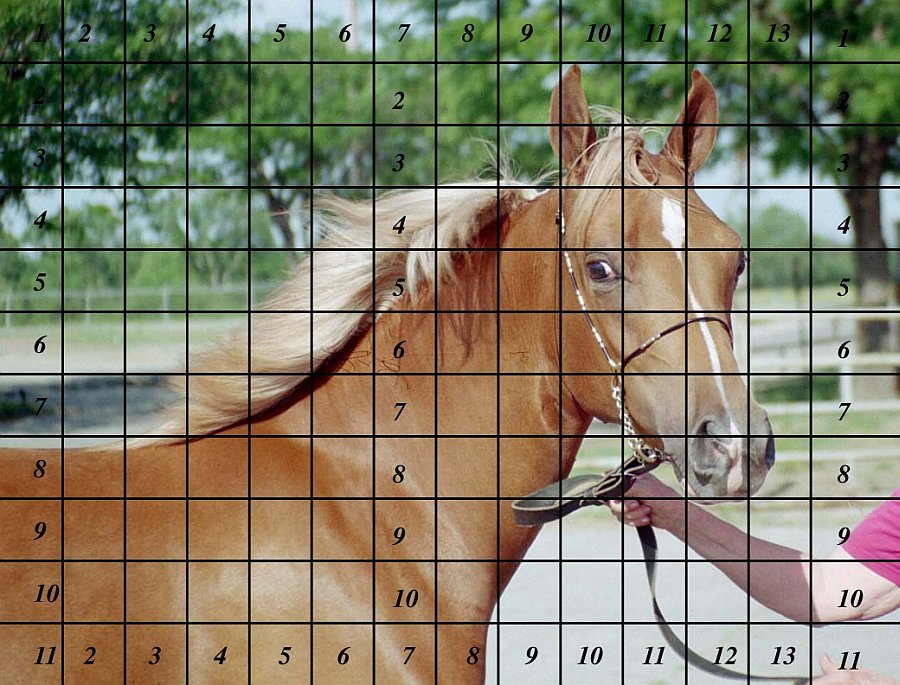
I as well print a grid on paper at full size if the drawing will be viii-i/2 ten fourteen or smaller, as this 1 is. For larger drawings I either print a grid on regular printer paper and enlarge the finished line drawing or hand draw a full size filigree. Since I'm not naturally a technical artist, I prefer the first of those 2 methods.
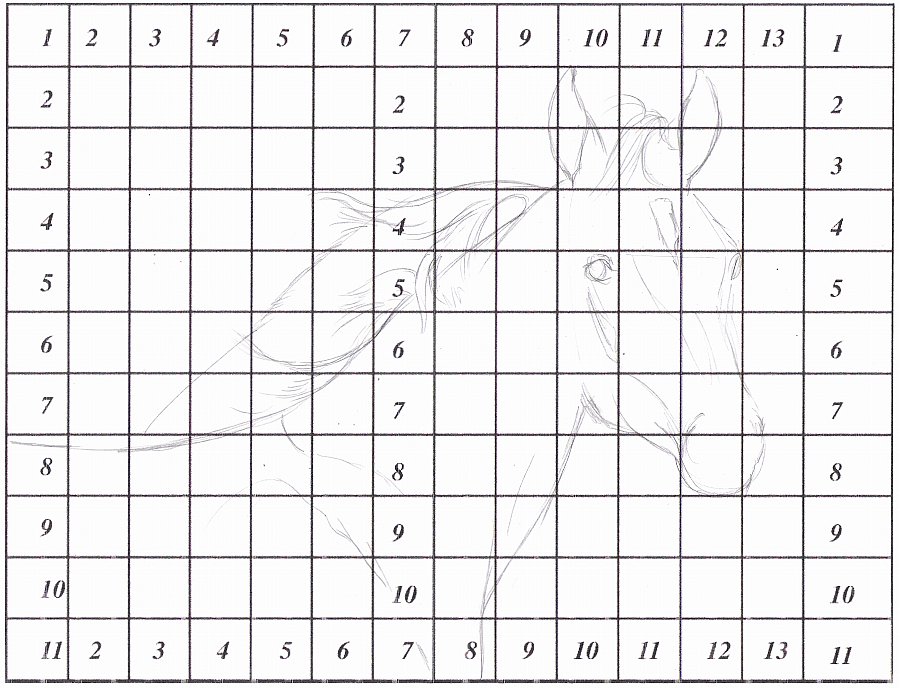
The Drawing
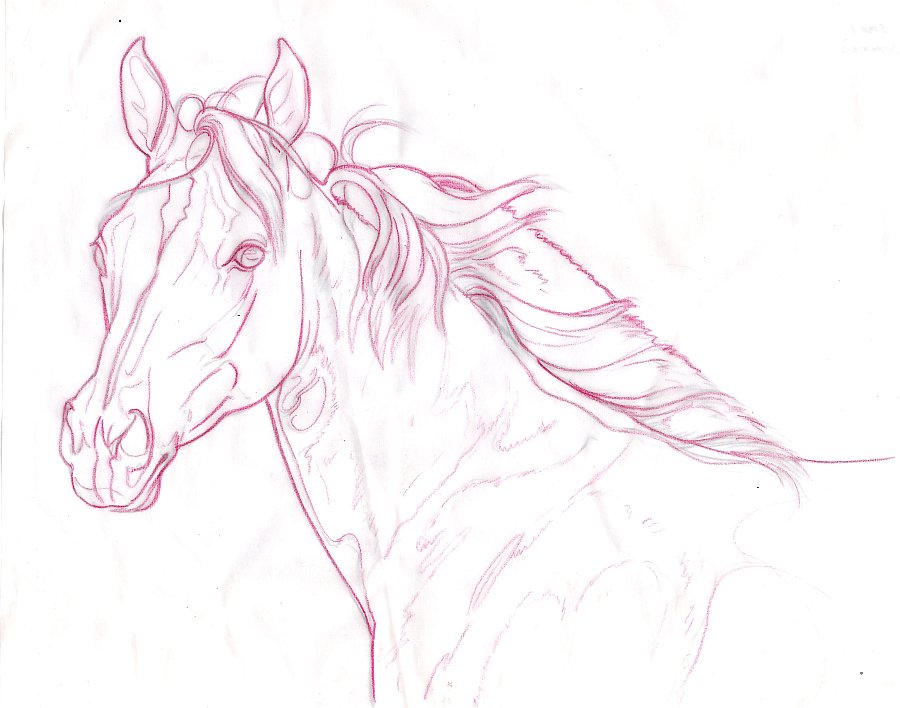
The colored pencil cartoon passes through several revisions, as shown beneath, showtime with a rough drawing on the filigree.
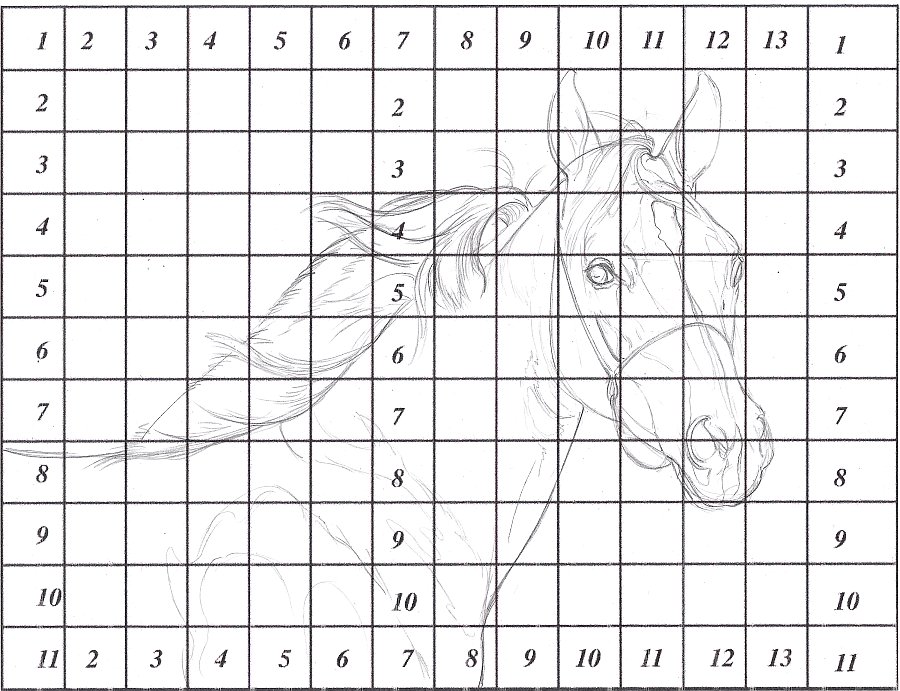
The rough cartoon is then refined on the gridded paper. Information technology may accept simply a 24-hour interval or 2 to achieve this point (as with this drawing) or it may take a calendar week, depending on the size and complexity of the drawing.
When the cartoon has avant-garde as much as possible with the use of the grid, I transfer it to tracing paper and redraw information technology. I make changes and corrections throughout this process, refining the drawing, increasing the level of detail, and making the drawing as authentic as possible.
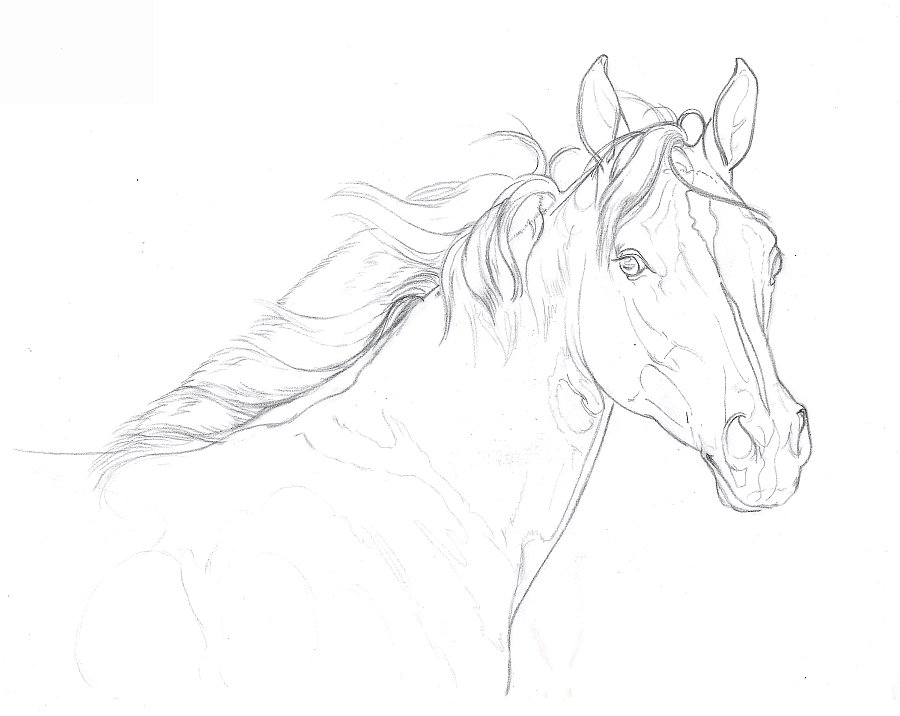
The next stride is making a reverse drawing. I turn the tracing paper over and redraw the drawing from the back. Again, I make corrections and adjustments. I as well flip the reference photograph on the calculator. I repeat this process until the drawing is as right as possible from both sides (front and back).
The reason for this is that I draw with a natural right-handed bias. Working on a reverse epitome of the drawing and from a reversed reference photo helps correct that bias.
A final circular of revisions and corrections on the front and the drawing is ready to exist transferred to the fine art newspaper.
Colour Work
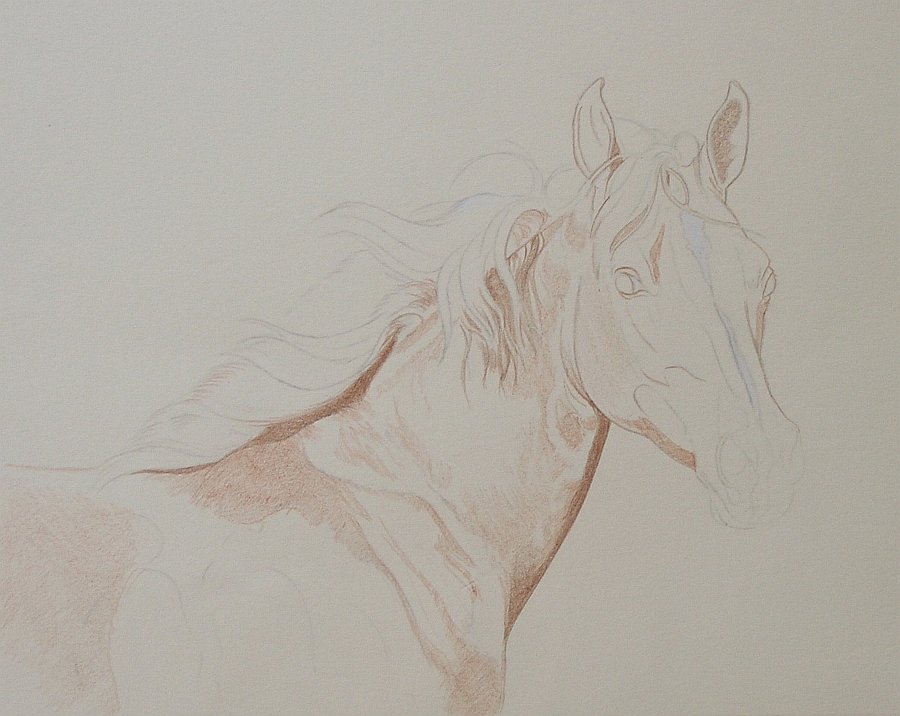
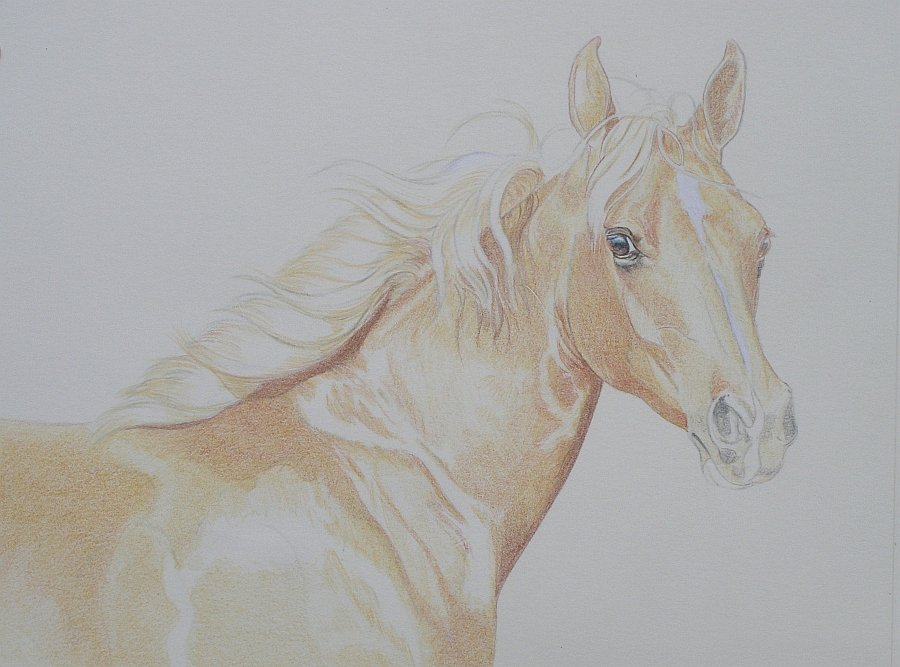
Step 1
This is a express palette work, so I selected the advisable pencils at the starting time. Colors ranged from Cream and White for light colors to Sienna Brownish for the darkest color.
I'm using a direct method of color application, and so when I began color piece of work, I matched the pencils as closely as possible to the shades on the reference photo. Shadows were outlined, then shaded with Sienna Chocolate-brown, followed past Burnt Ochre in the middle tones.
In some areas, I applied colour fairly heavily and used the pencil held upright, with a edgeless tip, and tight, round strokes to get an even colour layer.
In other areas, I used a sharp bespeak and applied colour in the management of hair growth with curt, well-baked strokes. I didn't practise anything with the highlights considering the paper color closely approximates the colour of most of the highlights. They will announced equally darker colors are applied effectually them, so I outlined and worked around them.
I used White on the blaze.
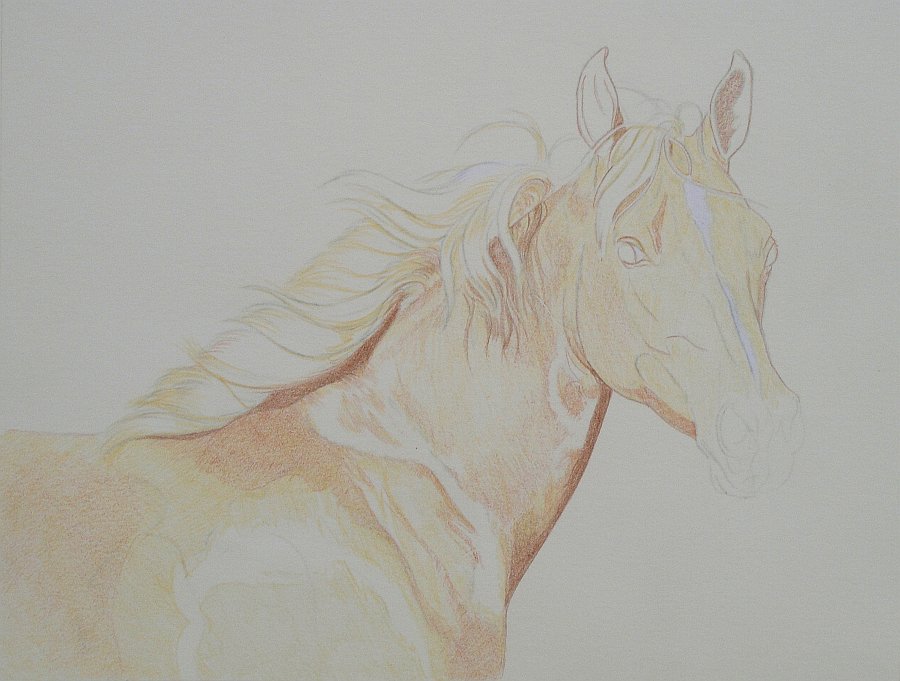
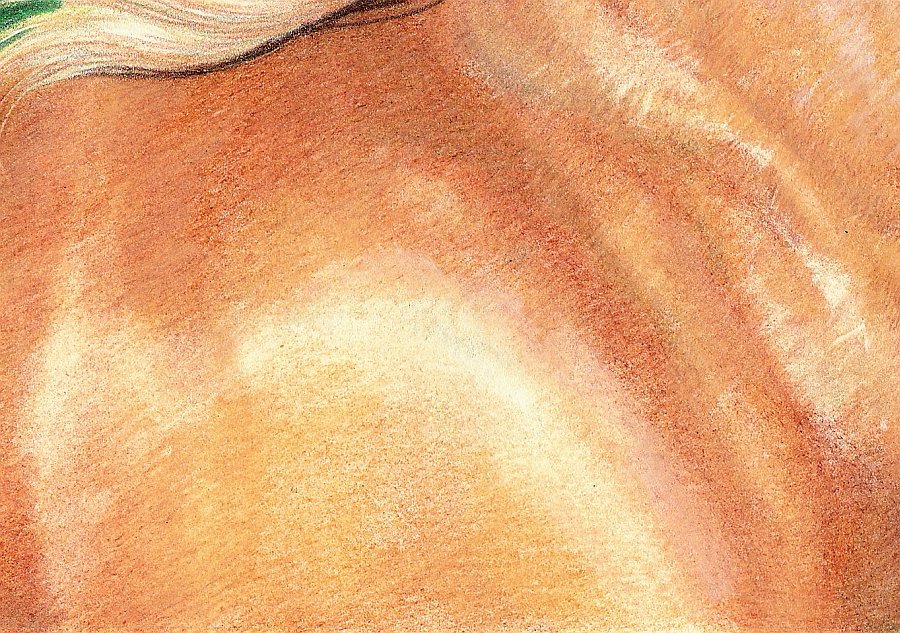
Stride 2
I glazed Sand over all parts of the filly except the blaze, brightest highlights, and the areas inside the ears and around the muzzle. I started with a abrupt pencil, but continued to employ information technology as the tip blunted, working with directional and circular strokes property the pencil upright and with directional strokes practical with the side of the pencil.
When I finished the body, I add a second layer of Sand in the shadows of the mane and forelock.
Step 3
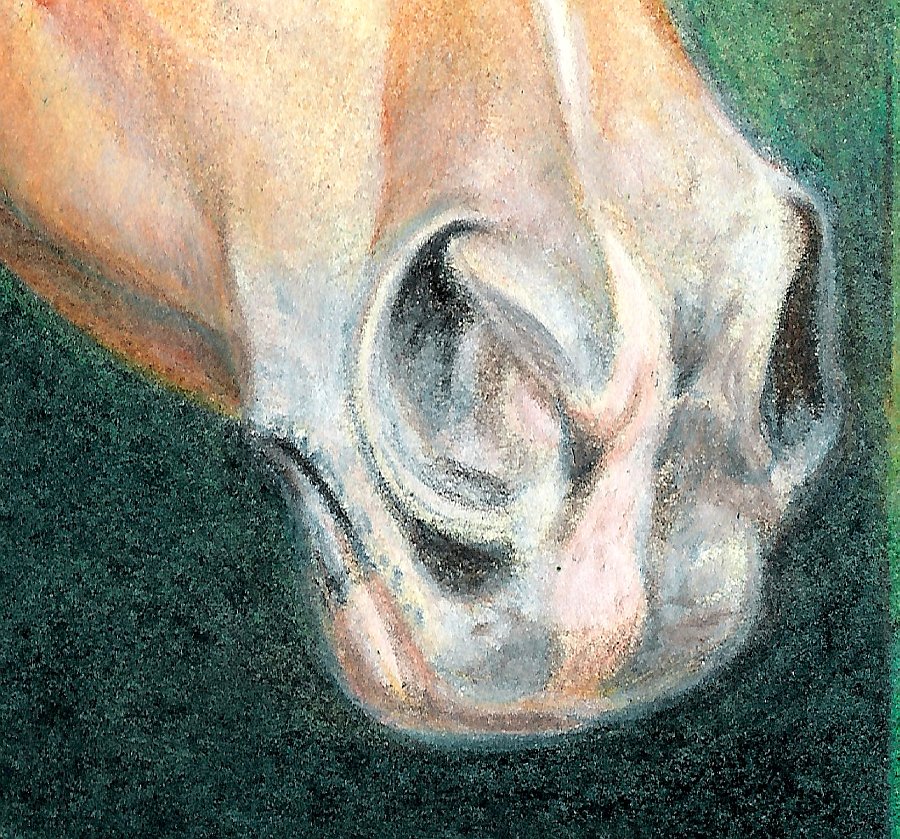
With the basic color in identify, I began work on the eyes and muzzle, outlining each area with French Grayness 50% in order to institute the lights and darks and the shapes of otherwise vague areas. Colors I used were Blackness, Peacock Blueish, Dark Umber, Burnt Ochre, French Grey l%. I kept my pencils very sharp to define details and to cover the paper as completely as possible with minimal force per unit area.
At this stage in this lesson on How to Draw a Equus caballus with Colored Pencils, I use medium pressure or less, often working with such light pressure that it'due south difficult to run into in a photograph or browse. It's much easier to make corrections if colour is lightly applied. Working on multiple, light layers as well allows me to continue refining and correcting the image as I add color.
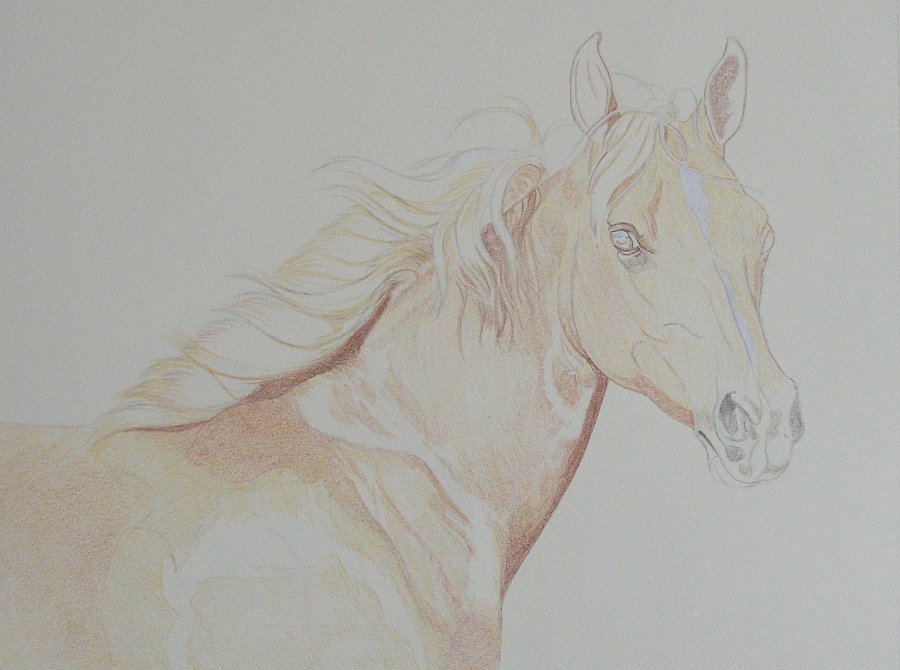
Stride 4
I darkened the heart to bring out the highlight and reflected blues, then worked on the lids and the surrounding face by layering Sienna Chocolate-brown, Burnt Ochre, and Sand in the shadows and middle tones, especially around the head.
All of the work was done with sharp pencils and short strokes, normally in the management of either hair growth or body contours. In the jowl and a couple other areas, I cross hatched.
I besides impressed a few flyaway hairs around the caput and face up using my favorite impressing tool, an quondam Zebra ball point pen with no ink and a fine signal.
I layered Yellow Ochre over all of the horse, including the cage and parts of the mane. The only areas I worked around were the bonfire and the brightest highlights on the face up, neck and shoulder.
Footstep 5
Beginning with the offside ear, I began defining shadows and centre tones with Sienna Dark-brown. I outlined the bolder shadows, and then filled them in. For the shadows with softer lines, I either outlined them very lightly (the left side of the upper blaze) or shaded very lightly to an undefined border (the right side of the upper bonfire.
I used pressure of two to 3 (on a calibration of 0 to 10) and sharpened my pencil ofttimes.
For the shadow within the offside ear, I layered Yellow Chartreuse to see what affect a yellow-green had on the tone of the colour. There was some change, merely not as much equally is called for.

Step 6
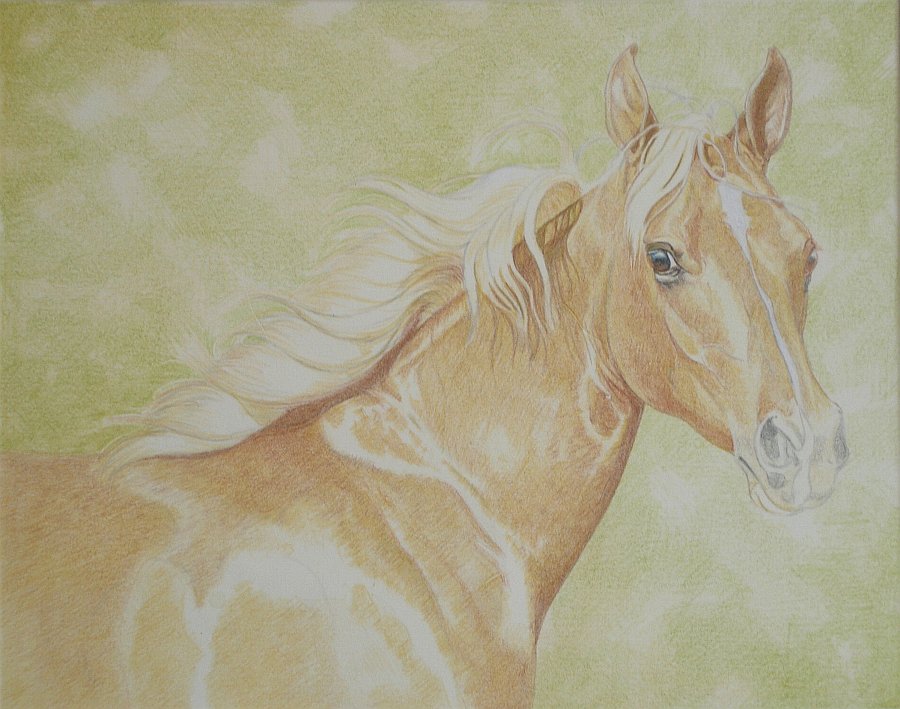
I wanted the appearance of blurred foliage for the background. Something to complement the filly's glaze colour without overpowering her. I began with a layer of Limepeel hatched and cross-hatched in short, parallel, diagonal strokes. I also used horizontal, vertical and circular strokes. Edges were random on undefined from the commencement. Lights and darks were established in a totally random pattern based on the number of layers of Limepeel. The more layers, the darker the value. Since I used light pressure, none of the values were very nighttime.
Step vii
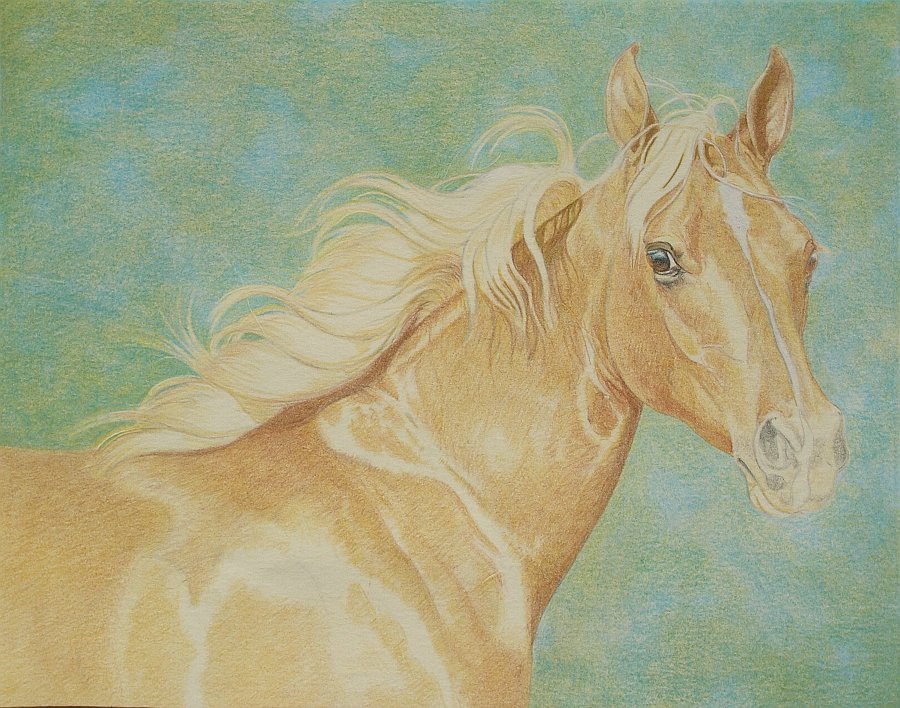
The next color was Truthful Blue, which I applied with a variety of strokes throughout the groundwork. Not Photo Blue was side by side layered over most of the groundwork.
The improver of darker colors fabricated the mane pop, but I couldn't get a decent blend. And so I worked over it with Faber-Castell Art Grip Light Blue. That color was a shade or two darker than Non Photo and information technology was much dryer (less wax binder). The resulting color was darker and smoother. I worked in several directions with this colour, even doing some shading along the edges in an endeavor to fifty-fifty out the colour.
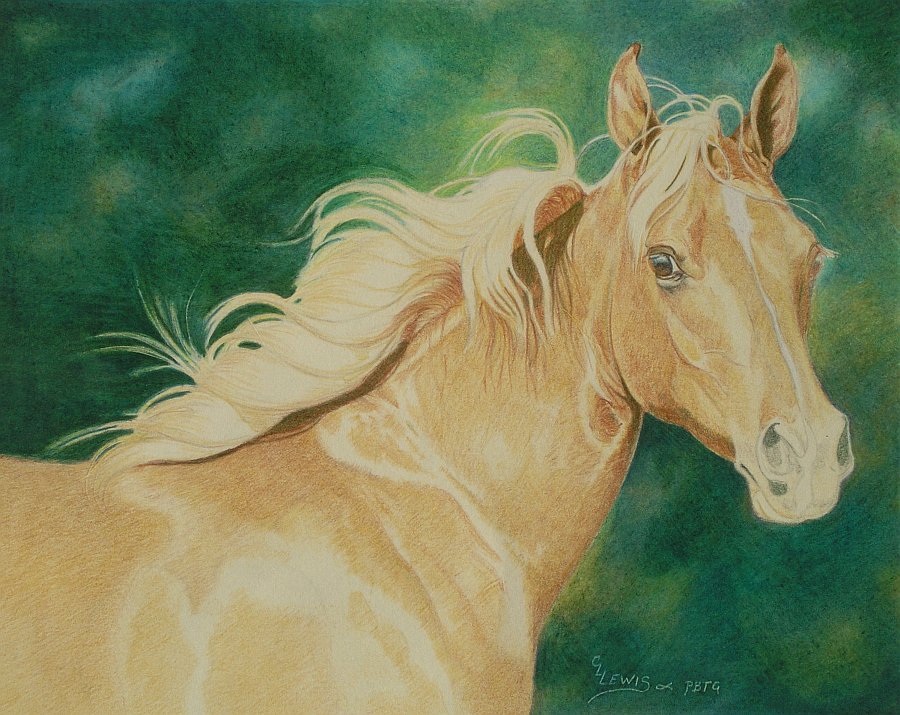
Footstep viii
Because greens can get very bold very fast, I side by side layered Light Umber over the background. I used low-cal pressure to utilise two layers of opposing diagonal strokes in a random pattern.
At that place isn't much difference betwixt this illustration and the previous illustration, but calculation Low-cal Umber did create a more than natural green.
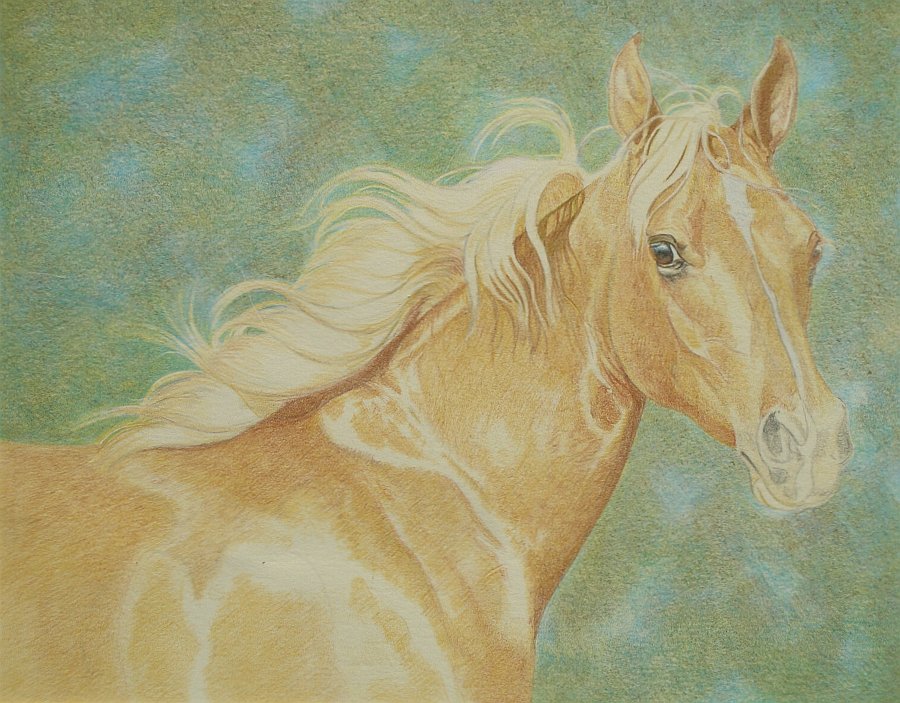
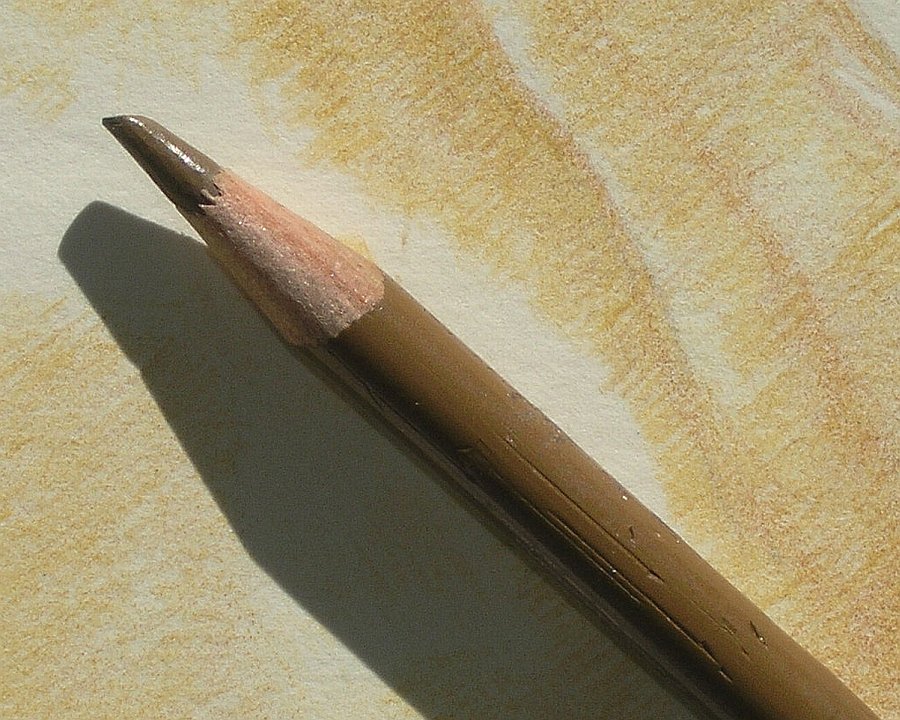
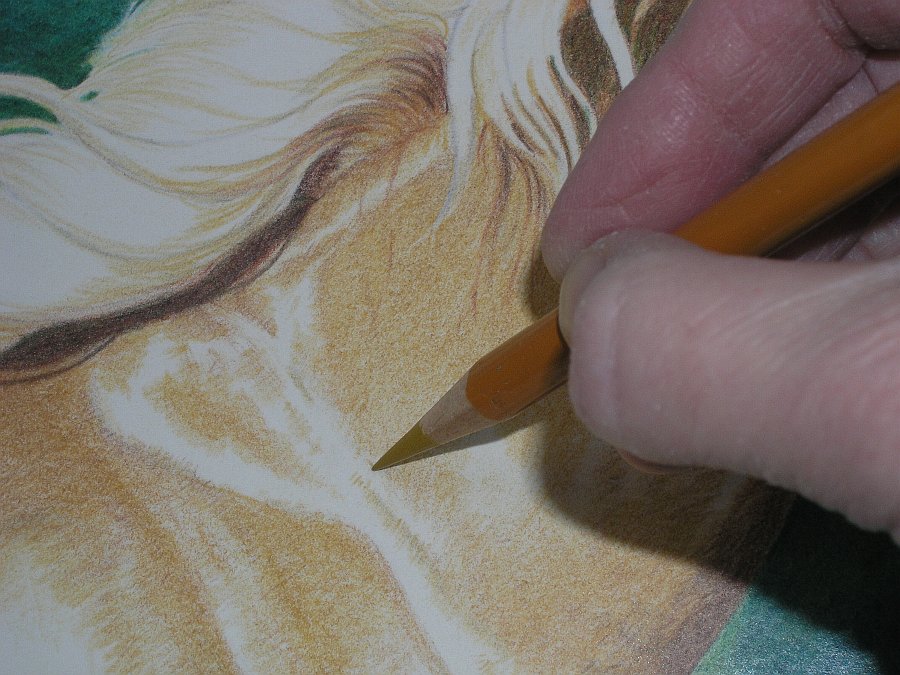
I also used a blunt tip, equally you lot can see below. The tip of this pencil has two surfaces. The 'long' side, which you lot tin can see on the pencil itself, and a curt side, which is visible in the pencil's shadow. Betwixt these two edges, I was able to utilize broader, less sharply defined strokes and to create the 'soft focus' look I want for the background.
Notice the slanted side of the pencil itself and the edgeless edge of the pencil'southward shadow. Those are two different edges. Making use of both of them aided in creating the look I wanted with a minimum of effort.
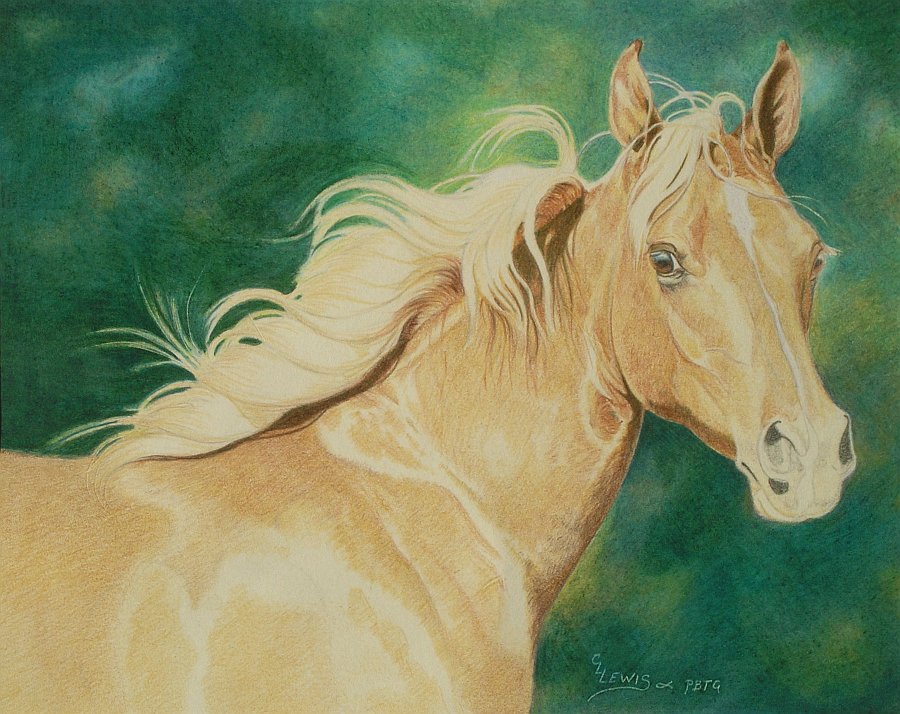
Step nine
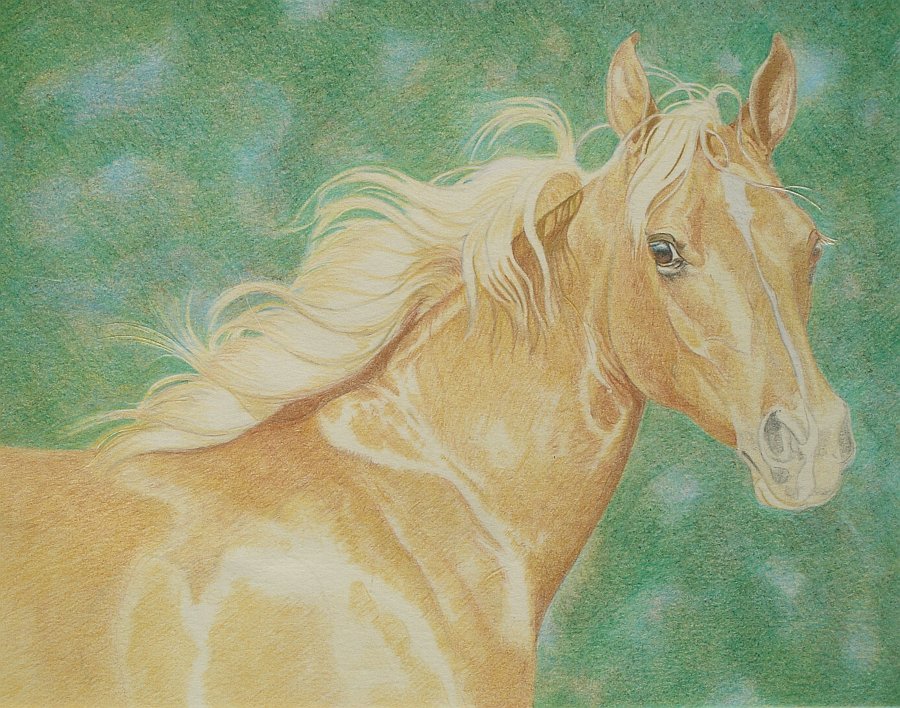
Next, a few layers of Grass Light-green.
The but way these layers differed from what I did with Low-cal Umber in the previous layers was that I worked more carefully around the filly. I likewise used circular strokes in some areas and I sharpened the pencil once or twice to get amend coverage and a more than fifty-fifty layer of colour.
Pace ten
I next layered Yellow Chartreuse over the top one-half of the background and Copenhagen Blue over the bottom one-half. The purpose of using two colors was to begin creating a libation, darker lower groundwork with a warmer, lighter upper background, thus creating a little bit of pictorial depth without adding a lot of item.
I applied each color with a variety of strokes ranging from hatching and crosshatching to tight round strokes. I used medium pressure for both colors and kept the pencils as abrupt as possible.
Next, I glazed Copenhagen Blue over all of the groundwork, followed by another layer of Yellow Chartreuse. I finished with a terminal layer of Xanthous Chartreuse applied with a blunt point and medium heavy pressure over the peak one-half.
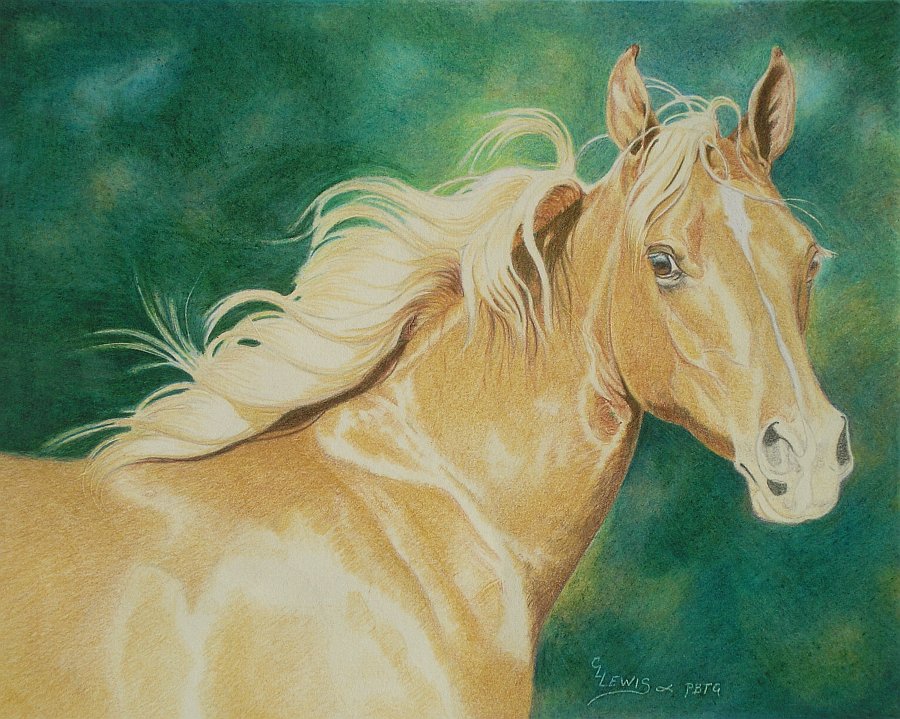
Stride 11
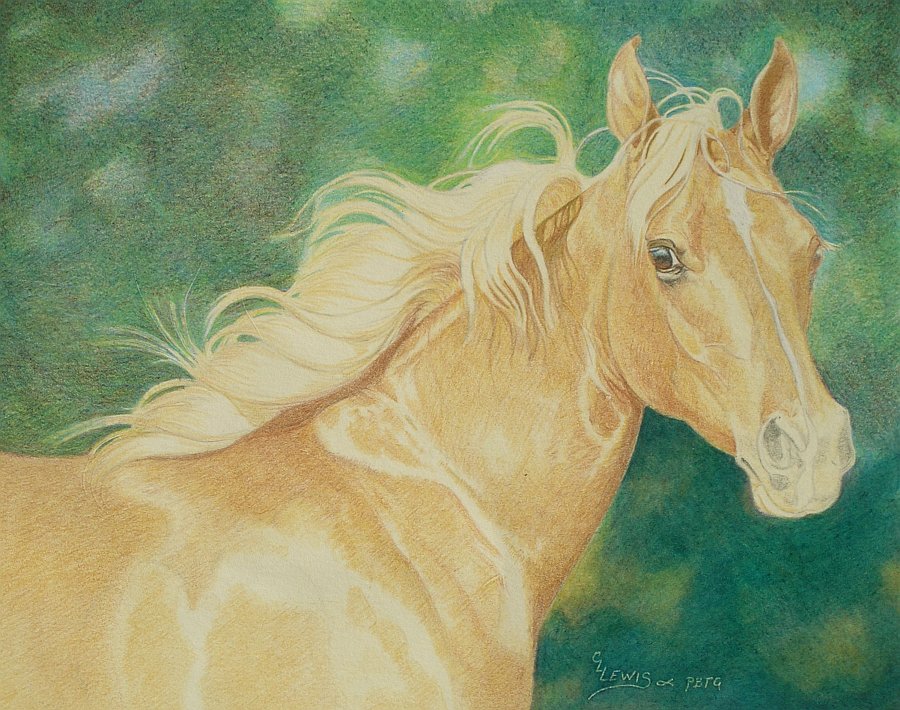
The greens were still a little too bold, so I layered Tuscan Ruby over nigh of the groundwork. To create brighter color and focus attention on the filly'south face, I didn't tone downwardly the greens effectually her ears or virtually the off side eye. I used medium lite pressure (handwriting pressure) and a precipitous pencil. I likewise worked primarily in diagonal crosshatching strokes.
Finishing work on the background began with Peacock Green and Yellow Ochre and a colorless blender (also by Prismacolor). Using heavy pressure, I practical Peacock Greenish or Yellow Ochre in each area. In some areas, I layered colors; glazing Peacock Light-green first and burnishing with Yellow Ochre or glazing with Yellowish Ochre and burnishing with Peacock Light-green. Since the burnishing color affects the overall color, I was able to create subtle gradations in colour depending on the color I used for burnishing.
I burnished all of the groundwork with the colorless blender, then added a final coat of Peacock Light-green to cease it. The portion of the background that is finished is the lower half in this illustration. The peak half still needs the final burnishing.
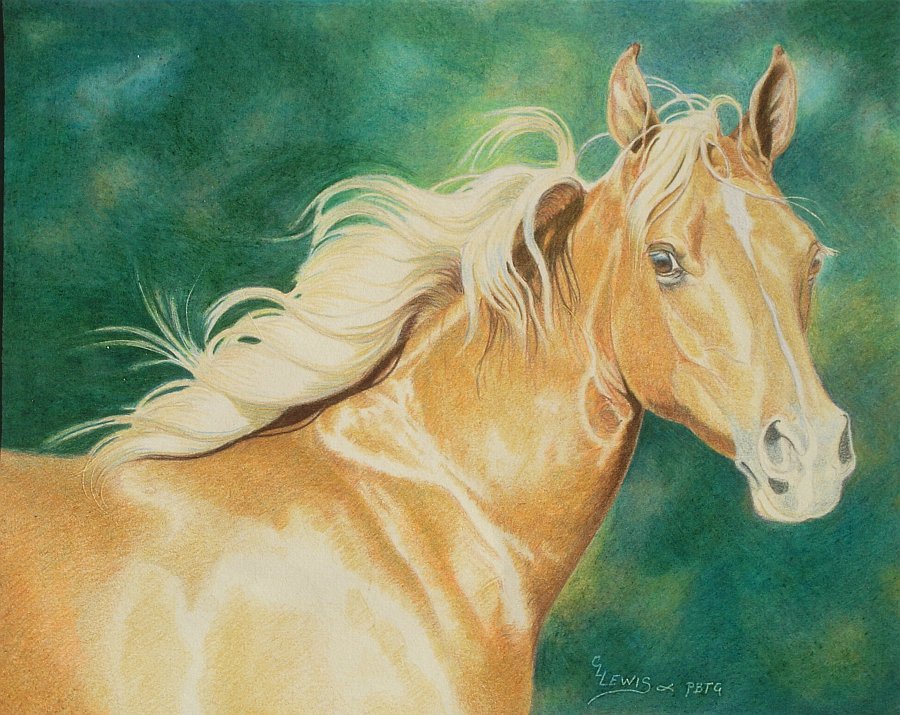
Step 12
I continued layering and burnishing Peacock Green and Yellow Ochre throughout the groundwork. I glassy each surface area with the colorless blender, then used rubbing alcohol and a cotton swab to further alloy and smooth the background.
Once the paper was dry, I touched up a couple remaining areas with Peacock Green using the side of a sharpened pencil and lite pressure to blur some of the transitions that were as well bold.
That was helpful merely didn't completely tone down the colors, so I layered Dark Green over much of the background. In the areas I wanted to smooth out, I used the side of the pencil and low-cal pressure. In other areas, particularly in the corners and the groundwork around the mane, I used the tip of the pencil and heavier pressure.
To finish, I polished most of the background with a slice of paper towel folded ii or three times.
Step 13
Next was finishing the horse.
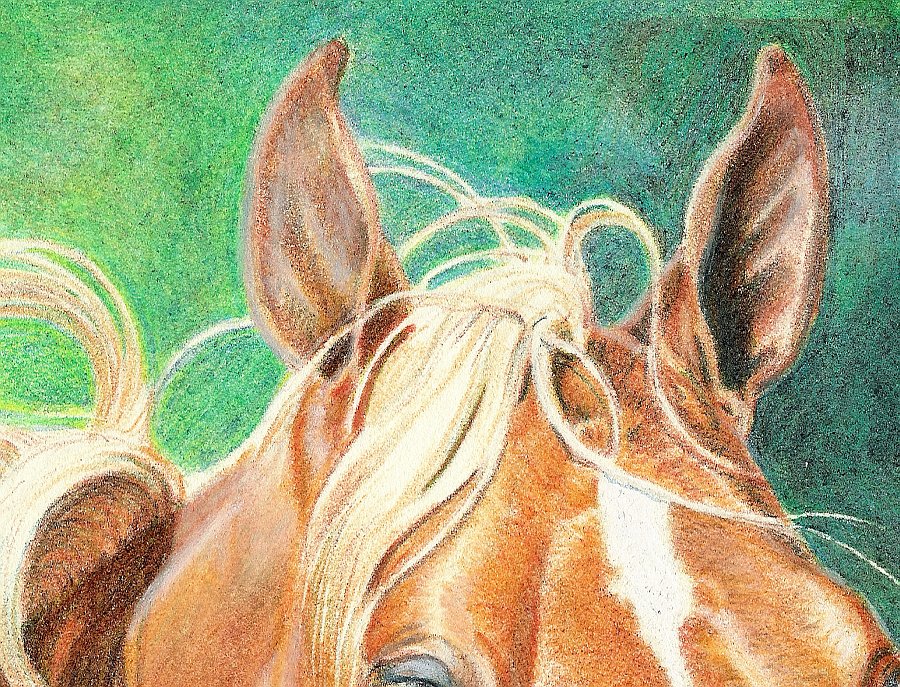
Beginning with the ears, I layered Terra Cotta into the shadows and darker mid tones. The reference (which I enlarged and viewed on the computer) showed a lot of crimson tones in the shadows of the mane, and then I layered Terra Cotta into those areas, as well.
Well defined shadows inside the ears, under the mane, under the jowl were outlined with a sharp pencil and low-cal pressure. I too adapted contours where necessary.
Those shapes were then filled in with a sharp pencil and short, closely spaced strokes. In near areas, I used a combination of strokes to get even coverage.
With the less defined shadows and in the places where shadow blended into mid-tone, I used directional strokes, low-cal pressure, and a sharp pencil, merely didn't outline the shapes.
In the areas where hair growth is visible, I used brusk, directional strokes to mimic the await of hair growth patterns.
Step fourteen
I next used Dark Green to darken the darkest shadows in the ears, under the head, and below the mane. I also worked around the muzzle. Once again, I outlined well defined shapes and filled them in. In the remaining shapes, I added colour without outlining.
I used greenish at this stage to add darkness to the reds and golds without making them likewise flippant. Any cool color would have worked. My colors of preference are either Indigo Blue or Black Grape.
For this drawing, I chose Nighttime Dark-green because the background is light-green. The color will non be obvious in the equus caballus, but having it in the mix creates colour harmony.
Finally, I layered Dark Umber over the aforementioned areas and along the bottom of the lower neck to warm up those absurd greens.
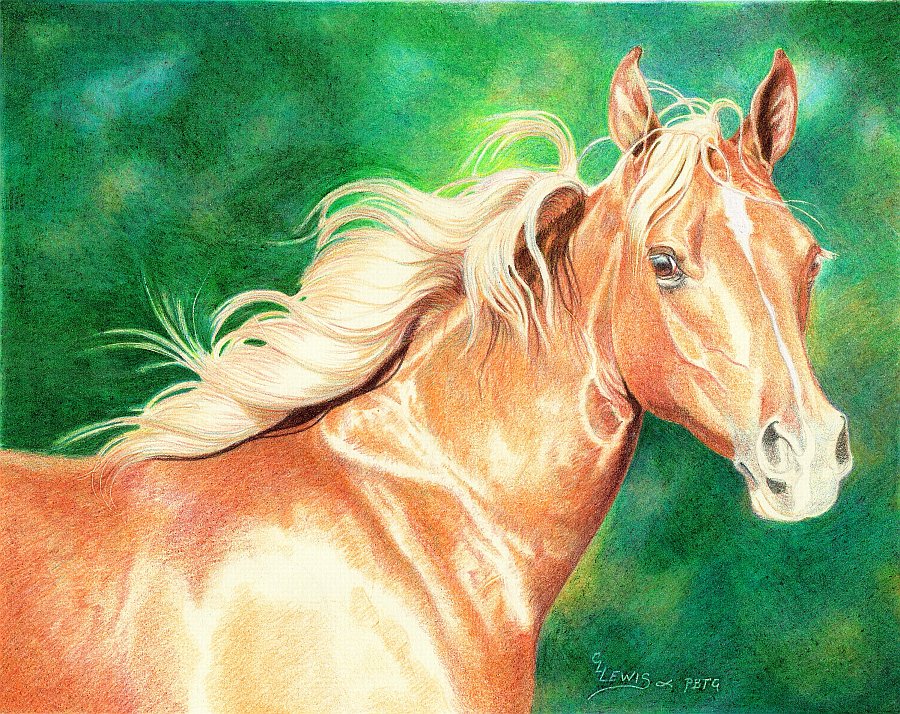
Back to The Horse
The terminal phase of this tutorial on How to Draw a Horse with Colored Pencils now begins; deepening color and saturation, broadening values, and building details on previous work. If I've done things right, this is the fun part!
To begin, I layered Yellow Ochre over most of the horse. The merely areas I worked around were the bright highlights on the caput and shoulder, the white blaze, and the strands of hair overlapping the forehead and cervix.
I used the side of a very sharp pencil and light to medium pressure level for most of this work, matching pressure to value. Calorie-free pressure level in lighter value areas; heavier pressure in the darker areas.
Right now, the goal is to layer color to build saturation, color, and value. I don't know how many layers that volition accept, and then I keep pressure calorie-free. This preserves the tooth of the paper as long every bit possible.
When working around the highlights, I used the point of the pencil and directional strokes to create softer edges.
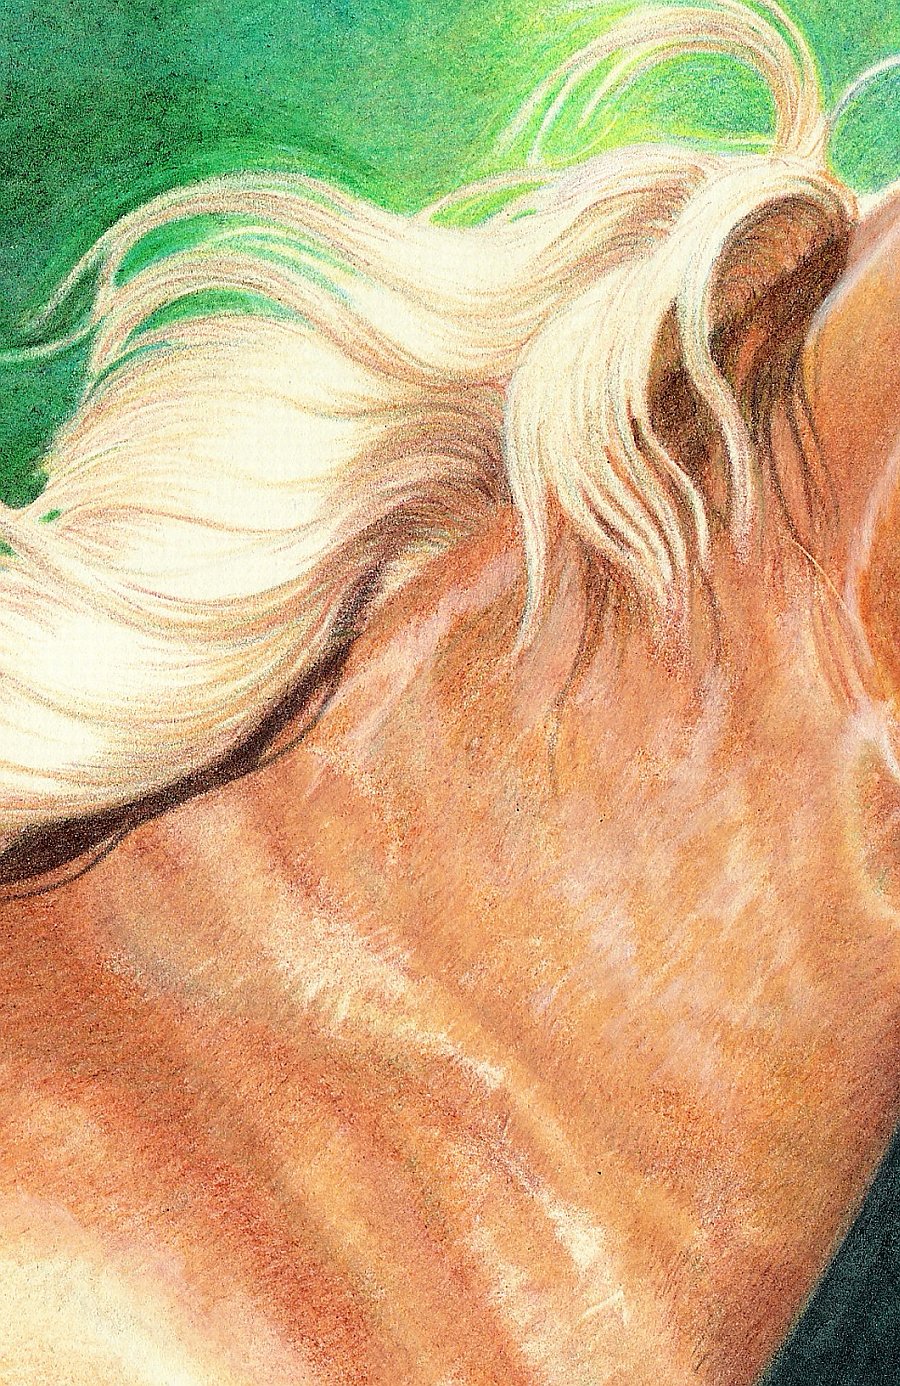
I likewise worked on the mane and forelock, adding warm middle tones to some areas and glazing Xanthous Ochre over the darker shadows.
Using very low-cal strokes and working in the direction of hair growth, I layered Mediterranean Blue over the filly's coat. I also stroked information technology into the mane in the shadowed areas using long strokes, and added a very light coat to the cage and inside the ears using a blunt tip and tight, round strokes.
Next, I layered Sienna Brown into the same areas using the aforementioned pressure and strokes.
Finally, I darkened the darkest shadows under the mane, along the throat and within the ears with Dark Umber, which I applied with heavy pressure (not quite burnishing).
Finishing Touches
Almost done with this tutorial on How to Draw a Horse with Colored Pencils. Hang in there!
Using light to medium pressure level, I layered Burnt Ochre over the night middle tones throughout the filly, start with her torso and working my way forward and upward.
I sharpened the pencil frequently and used a sharp tip to create the texture of pilus and to work around some of the highlights. Simply I likewise used a more blunt tip to lay down even layers of colour with trivial or no visible pencil strokes wherever necessary.
In the mane and forelock, I kept the pencil abrupt and used the tip to darken the center tones and shadows and brainstorm defining pilus masses.
Adjacent, I layered Goldenrod over all of the same areas and into the highlights over the shoulder and along the neck, where they are not quite as bright. I used light to medium light pressure and a variety of strokes ranging from short, directional strokes with a sharp pencil to broad strokes using the side of the pencil and following the contours of muscle and body.
I used French Grey 20%, 50% and lxx%; Blush and Calorie-free Blush; Dark Brownish, Indigo Blue, Light Umber, Black, Deject Blue, and White. I worked out the details of shadows and highlights, the shapes of nostrils and mouth, and the markings. Once the shapes were established, I alternated layers of color with burnishing. Nearly of the burnishing was done with White. The shadows were burnished with Lite Umber or French Grey seventy%, and so glazed with black.
I likewise worked the background around the cage, softening, and manipulating edges.
I used the same basic method – layer, burnish, layer, brighten – to piece of work up into the face. For this role of the work, my fistful of pencils included White, Cream, Sand, Yellow Ochre, Pumpkin Orange, Mineral Orange, Calorie-free Umber, the French Greys, Cloud Blue, and Blackness. Since I'd already put a lot of work into this role of the portrait, my attention was given to smoothing out color, punching up highlights and fine-tuning details.
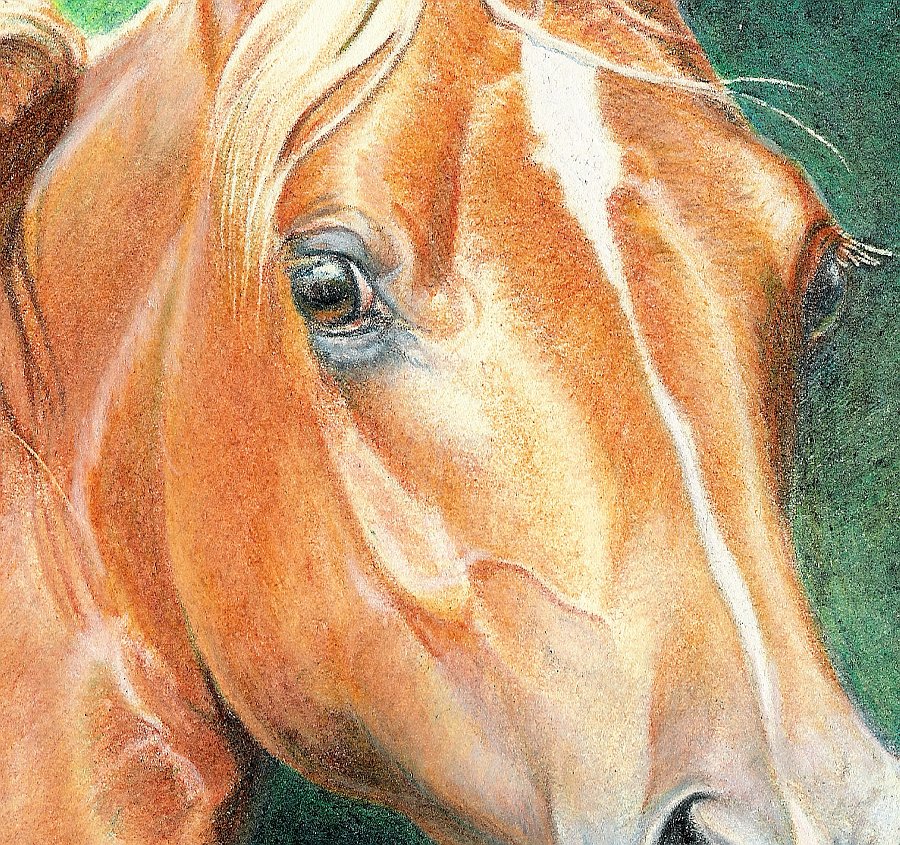
I used the same colors to exercise the ears, which proved to be the most difficult part of the portrait.
The forelock was detailed with touches of Sienna Brownish, Yellow Ochre, Indigo Blue and Dark Chocolate-brown Layered and White in the highlights.
I used the aforementioned colors I used in the face to finish the neck and shoulders. I concentrated on getting the highlights, middle tones, and shadows correct, so burnished with Deject Blue in the reflected light areas, Sand in the middle tones, and White and/or Cream in the highlights. In some areas, I used a colorless blender, simply I much prefer the expect of color glassy with color.
I used the aforementioned combination of colors and the same layer-burnish procedure to stop the neck, the shoulder, and the trunk.
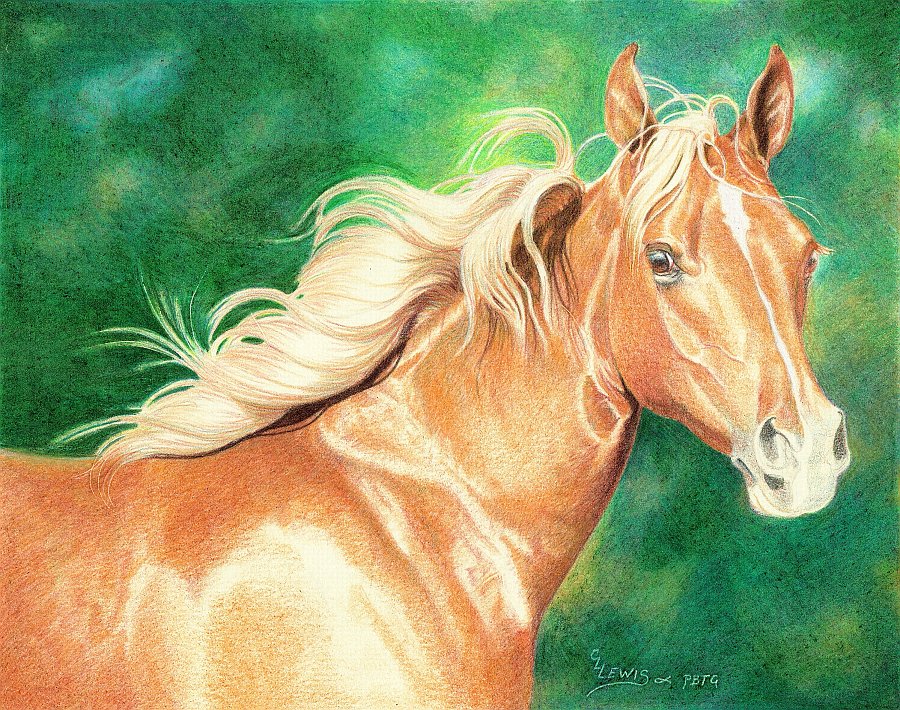
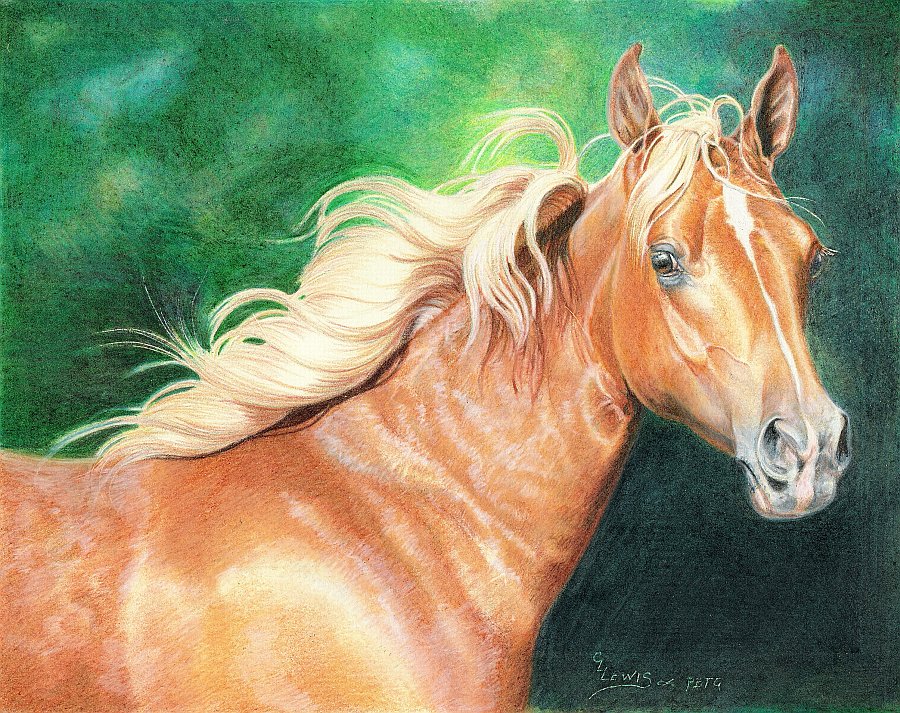
At this point, information technology'southward all a matter of examining the painting from edge to border, cleaning up edges, smoothing out colour, and making whatsoever other adjustments need to be made.
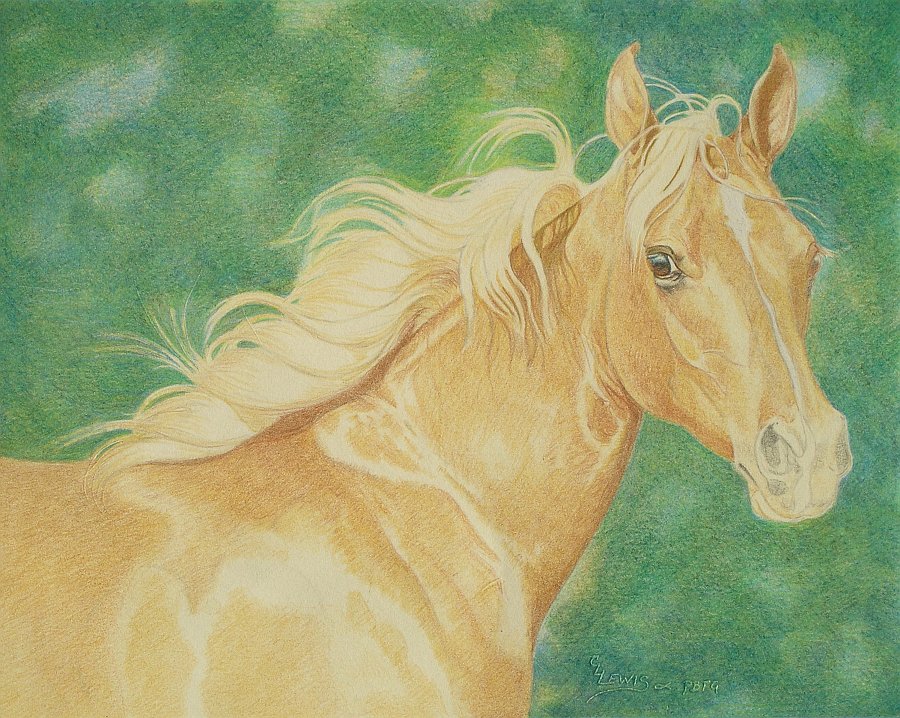
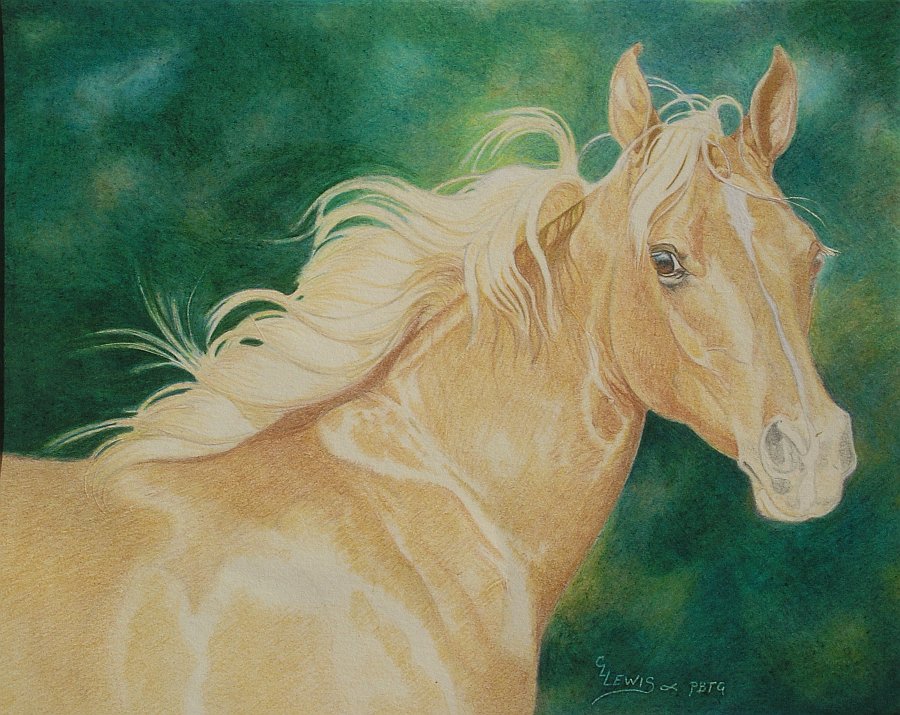
This is the finished portrait.
If you lot enjoyed this demonstration, you might also relish Carrie'due south book, Colored Pencils: The Directly Method Step-by-Step. The book is available for Kindle at Amazon.
Prints, Greeting Cards, cell phone covers of this paradigm are available through Fine Art America
I promise you enjoyed this stride by pace lesson on How to Draw a Horse with Colored Pencils. Find more than colored pencil lessons from our site here.
Virtually the Creative person
Carrie L. Lewis has been cartoon and painting for over 35 years. Her involvement in art began very early, with parents providing crayons and paper. She sold her first horse portrait at the age of seventeen and has been painting beautifully detailed portraits of horses for clients all over the United States always since.
Her oil painting technique draws from the work Johannes Vermeer (1632-1675) and William Bouguereau (1825-1905). In improver to borrowing their techniques, she uses as many classical materials every bit possible, including all-time possible oil paints.
Carrie also works in colored pencil using many of the same techniques used for oil painting.
Carrie has participated in exhibits in such locations equally Lone Star Park Race Track, Thousand Prairie, Texas and Remington Park Race Track, Oklahoma City, Oklahoma. In 2003, she participated in Village Place, a 1-time show in Louisville, Kentucky during Kentucky Derby weekend.
Since the early 90s, she has worked with the Michigan Harness Horseman's Clan, donating custom portraits to their annual benefit auction. Monies raised during this almanac art auction help fund a scholarship for the son or daughter of a fellow member horseman.
In 2007, Carrie's painting, "A New Day", was short listed in the Shadwell Estates Ltd. 2007-08 Stallion Brochure Competition.
"I have always loved horses. It is a joy born within, placed deep inside by God above.
"Classical art has been a honey since my first encounter with it. The works of such Groovy Masters every bit Rembrandt, Vermeer and Bouguereau have the ability to stir the soul and inspire my own creativity like no other fine art form.
"I suppose, given those 2 passions, information technology was natural that I should eventually learn and arrange the techniques of those Quondam Masters to my own attempts at capturing the spirit of the horse in oils."
Carrie's fine art instruction books are as detailed as her artwork. Her goal is to pass on her honey for art and for cartoon horses and the landscape to others.
Visit Carrie'due south website at Carrie L. Lewis Horse Painter

Source: https://www.artinstructionblog.com/how-to-draw-a-horse-with-colored-pencils
Posted by: thrushhaid1988.blogspot.com
0 Response to "How To Draw Horse Head Ink"
Post a Comment